Invite and onboard suppliers in the Flexport app
Couldn't load video
Invite and onboard suppliers in the Flexport app
Today, we'll walk through the new supplier onboarding experience.
The new supplier onboarding flow has two goals.
First, you'll see how you can invite suppliers and grow your supplier network straight from the client app, then track the status of every invitation.
This wasn't possible before. Your account executive handled it for you through an internal ticketing system.
Now it lives right in the client app. Second, you'll see how your suppliers register for an account and complete their basic onboarding in the client app themselves.
Today, that onboarding happens offline and suppliers can't book until it's done. Moving it into the client app gets your suppliers to their first booking faster because they can finish their onboarding requirements on their own. Let's get started.
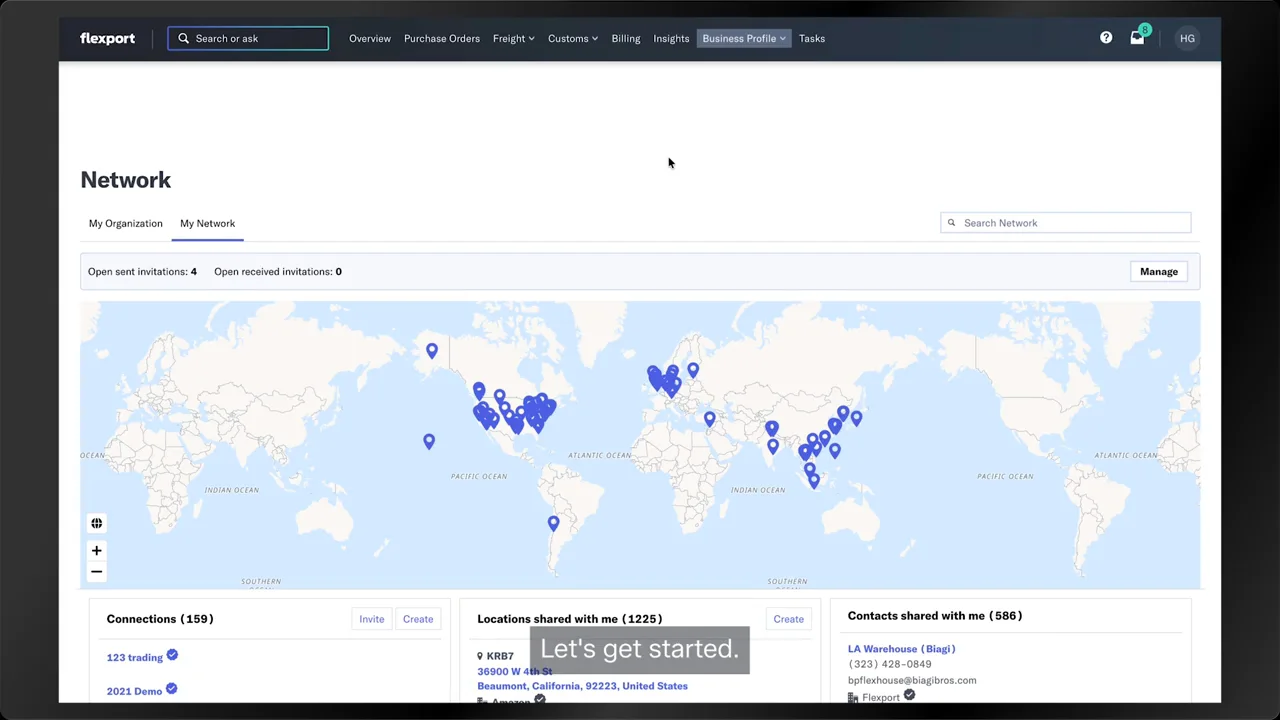
You'll start on the my network page under business profile.
Under business profile network, then my network, you'll find the new invitation management dashboard.
This demo account already holds some extra invitations and features, but here's how the new flow works.
First, you invite a partner to your network.
This is where you invite a supplier.
You can invite one supplier with this form, but we expect you'll usually work in batches.
That's why you can also send a batch invitation.
Download the template, fill it in, and upload it here to create and send many invitations at once.
We'll add a template we prepared earlier to this window and continue.
The app uploads the file and pulls in every contact from it.
That takes a moment.
The next page lets you review everything.
It groups all the contacts by company name.
For example, we're inviting four people from a company called Acme Trading.
It also flags any errors as you go.
This row is missing a company name, so we'll add one.
Here, the country is missing.
The onboarding flow needs a country to start correctly, so the app asks you for one.
We'll enter one here.
Now we'll continue.
Click next to review which locations and details you'll share with each supplier.
We want every supplier to have the locations they need to ship from the moment you invite them.
Here, you can check that you're sharing every contact location and its details with the supplier.
After that, we'll send out the invitations.
You can see them sending now.
The app confirms that 24 invitations went out, asking suppliers to join Flexport or log in if they're already on the Flexport network.
Refresh the dashboard, and you'll see all the new invitations listed here.
You'll see this list update as one of our example suppliers works through onboarding.
That's how you see and track the onboarding status of every supplier you invite.
So far, we've looked at your side as the consignee. So now let's switch to the supplier's view.
Your supplier gets an invitation email saying a contact at your company wants them to ship with Flexport and asking them to accept and create an account so they can start booking.
Once the email arrives, they click accept and create account. And if they don't respond, we send reminders.
That opens a landing page where they start setting up.
We'll walk through that setup now. First, they confirm their email. They can switch to a different address, such as a personal email or a colleague's if they need to.
After signing up, they create their company profile and their own user profile.
The app fills in much of this from the details you provided.
If your details are right, your supplier only has to confirm them.
Next, they update some details about their company.
This section tells us which team should help set them up.
They start with the location of their legal address.
We'll enter a placeholder here.
Then, they confirm whether their legal address is also their shipping address.
Next, they add the ports they use most. That helps us route them correctly. Say this supplier mainly ships out of this location, then we click continue.
Once that's done, they set a password.
That creates their account.
Then, the app logs them in automatically.
Your supplier now lands on the client app homepage for the first time.
At the top, a new onboarding banner gives them what they need to get oriented and get started.
We've given them a few clear tasks to complete.
The two most important ones sit at the top.
Submit a booking, complete the company profile.
They can also invite teammates, set preferences, or message a Flexport team member for help.
Suppliers told us they sometimes reach this homepage without knowing what to do next, and the banner addresses that.
Now let's switch back to your view for a moment.
Back on your invitation dashboard, where you track every invitation you've sent, the first supplier in the list has moved to accepted.
Its status pill changed from blue for sent to green.
That's because this supplier registered, confirmed their email, and created an account.
Their onboarding status still shows in progress. They haven't finished every onboarding item, so they can't book yet.
From this view, you can follow changes as they happen and make a few adjustments.
For example, you can resend an invitation if a supplier says the email never arrived.
You can also withdraw one.
There's also a way to message Flexport so the right person on our team can escalate it.
Now back to your supplier.
They're on their homepage again, and next they'll complete their company profile.
This button takes them to the client onboarding task list.
It's where they manage all of their tasks. They don't have any shipments yet, so their only task is this new one for setting up their supplier entity.
Clicking the task opens a workspace. Today, collect this onboarding information through offline emails and a manual operations process.
We've turned that work into client app tasks so your supplier can do it themselves.
Here, we ask for what we need to serve them compliantly, their legal entity name, which they can confirm if they gave it at registration, plus their business registration number, physical address, and mailing address.
We also ask about their preferences, like whether they need a house bill of lading or h b l or invoicing setup. Their answers decide which other onboarding tasks they'll need to complete.
For example, the h b l preference only applies to ocean freight. A supplier onboarding for air only can skip this task. If they start shipping air later, we'll ask them to complete it then.
We'll fill this in with sample data.
Now, the task is complete. Based on what the supplier entered, the app now shows a few more tasks.
There's now a billing setup task and an h b l preference task, both triggered by the answers in the previous step.
Your supplier moves on to the next task and completes it.
Once they finish every task, they're fully set up and can book with confidence.
Remember, your supplier needs to submit a booking and complete their profile.
After that, we consider them successfully onboarded.
Related videos
 Product Demos10 Minute WatchWatch now
Connect Microsoft Dynamics 365 Finance & Operations to Flexport
Set up an ERP integration between Microsoft Dynamics 365 Finance & Operations and Flexport, starting from the integrations tab in your business profile.
 Product Demos10 Minute WatchWatch now
Set up a Microsoft Dynamics 365 Business Central integration
Walk through creating a Business Central ERP integration with Flexport, from the integrations tab to a connected account.
 Product Demos2 Minute WatchWatch now
What's new in Atlas: rail, barge, disruption monitoring and emissions
Atlas routing now includes barge and rail legs, Flexport predicted dates, observed transit times, CO2 emissions per route, and AI-surfaced disruptions.
 Product Demos3 Minute WatchWatch now
First booking with Flexport: a guide for English-speaking shippers
Walk through your first shipment with Flexport in English.